Thank you for purchasing the Earthshine
Design Arduino Starter Kit. You are now well on your way in your journey into
the wonderful world of the Arduino and microcontroller electronics.
This book will guide you, step by step,
through using the Starter Kit to learn about the Arduino hardware, software and
general electronics theory. Through the use of electronic projects we will take
you from the level of complete beginner through to having an intermediate set of
skills in using the Arduino.
The purpose of this book and the kit is to
give you a gentle introduction to the Arduino, electronics and programming in C
and to set you up with the necessary skills needed to progress beyond the book
and the kit into the world of the Arduino and microcontroller electronics.
The booklet has been written presuming
that you have no prior knowledge of electronics, the Arduino hardware, software
environment or of computer programming. At no time will we get too deep into
electronics or programming in C. There are many other resources available for
free that will enable you to learn a lot more about this subject if you wish to
go further. The best possible way to learn the Arduino, after using this kit of
course, is to join the Arduino Forum on the Arduino website and to check out the
code and hardware examples in the ʻPlaygroundʼ section of the Arduino
website too.
We hope you enjoy using the kit and get
satisfaction from creating the projects and seeing your creations come to life.
How to use it Ako ho používať.
The book starts off with an introduction
to the Arduino, how to set up the hardware, install the software, etc.
We then explain the Arduino IDE and how to
use it before we dive right into some projects progressing from very basic stuff
through to advanced topics. Each project will start off with a description of
how to set up the hardware and what code is needed to get it working. We will
then describe separately the code and the hardware and explain in some detail
how it works.
Everything will be explained in clear and easy to follow steps.
The book contains a lot of diagrams and photographs to make it as easy as
possible to check that you are following along with the project correctly.
Všetko bude vysvetlené jasnými a ľahko sledovateľnými postupnými krokmi.
Knižka obsahuje množstvo kresieb a fotografií, aby sa to urobilo tak
jednoduché ako je len možné, aby ste mohli odkontrolovať či postupujete
presne podľa projektu.
What you will need Čo potrebujete
Firstly, you will need access to the internet to be able to
download the Arduino IDE (Integrated Development Environment) and to also
download the Code Samples within this book (if you donʼt want to type them
out yourself) and also any code libraries that may be necessary to get your
project working.
Najprv, potrebujete prístup
do Internetu, aby ste si stiahli Arduino IDE(Integrované vývojové prostredie)
a taktiež stiahnuť Vzory programov uvedené v tejto knihe (pravda ak ich
nechcete sami naťukať) a taktiež niektoré knižnice programov ktoré sú
nevyhnutné na to aby váš projekt pracoval.
You will need a well lit table or other flat surface to lay out
your components and this will need to be next to your desktop or laptop PC to
enable you to upload the code to the Arduino. Remember that you are working with
electricity (although low voltage DC) and therefore a metal table or surface
will first need to be covered in a non-conductive material (e.g. tablecloth,
paper, etc.) before laying out your materials.
Budete potrebovať dobre
osvetlený stôl alebo iný rovný povrch na ktorý položíte svoje komponenty
a tento budete musieť mat blizko pri svojom stolovom počítači alebo notebooku
na to aby ste vedeli zapísať (uploud) program do Arduina. Nezabudnite, že pracujete
s elektrinou (aj keď s nízkym jednosmerným napätím ) a preto kovový
povrch stola musíte najprv pokryť nevodivou podložkou (napr. tvrdeným
papierom) skôr ako na to položíte svoje materiály.
Also of some benefit, although not essential, may be a pair of
wire cutters, a pair of long nosed pliers and a wire stripper.
Taktiež určitou výhodou,
samozrejme nie nevyhnutnou, môže byť pár nožničiek na drôt, pár
klieští s dlhým nosom a klieští na odstraňovanie izolácie drôtu.
A notepad and pen will also come in handy for drawing out rough
schematics, working out concepts and designs, etc.
Poznámkový blok a pero
bude užitočné na kreslenie hrubých náčrtkov schém, pracovných koncepcií
a návrhov, atd.
Finally, the most important thing you will need is enthusiasm
and a willingness to learn. The Arduino is designed as a simple and cheap way to
get involved in microcontroller electronics and nothing is too hard to learn if
you are willing to at least ʻgive it a goʼ. The Earthshine Design
Arduino Starter Kit will help you on that journey and introduce you to this
exciting and creative hobby.
Konečne, najdôležitejšia
vec, ktorú potrebujete, je nadšenie a ochota sa učiť. Arduino je koncipované
ako jednoduchá a lacná cesta ako sa zapojiť do elektroniky postavenej na baze
mikropočítačov a nič nie je tak ťažké sa naučiť ak ste ochotný
prinajmenšom ʻ to vziať a ísť ʻ. Začiatočnícka stavebnica
od Earthshine Design vám pomôže na tejto ceste a uvedie vás do tohto
vzrušujúceho a kreatívneho hobby.
Mike McRoberts
May 2009
The Starter Kit Contents
Obsah Štartovacej stavebnice
Please note that your kit contents may look slightly different to those
listed here
Prosím uvedomte si, že vaša
stavebnica môže byť mierne odlišná od tej ktorú tu uvidíte.
What exactly is an
Arduino?
Čo zač je to Arduino?
Now that you are a proud owner of an Arduino, or an Arduino
clone, it might help if you knew what it was and what you can do with it.
In its simplest form, an Arduino is a tiny computer that you can
program to process inputs and outputs going to and from the chip.
The Arduino is what is known as a Physical or Embedded Computing
platform, which means that it is an interactive system, that through the use of
hardware and software can interact with itʼs environment.
For example, a simple use of the Arduino would be to turn a
light on for a set period of time, letʼs say 30 seconds, after a button has
been pressed (we will build this very same project later in the book). In this
example, the Arduino would have a lamp connected to it as well as a button.
The Arduino would sit patiently waiting for the button to be pressed. When you
press the button it would then turn the lamp on and start counting. Once it had
counted 30 seconds it would then turn the lamp off and then carry on sitting
there waiting for another button press. You could use this set-up to control a
lamp in an under-stairs cupboard for example. You could extend this example to
sense when the cupboard door was opened and automatically turn the light on,
turning it off after a set period of time.
The Arduino can be used to develop stand-alone interactive
objects or it can be connected to a computer to retrieve or send data to the
Arduino and then act on that data (e.g. Send sensor data out to the internet).
The Arduino can be connected to LEDʼs. Dot Matrix displays,
LED displays, buttons, switches, motors, temperature sensors, pressure sensors,
distance sensors, webcams, printers, GPS receivers, ethernet modules, The
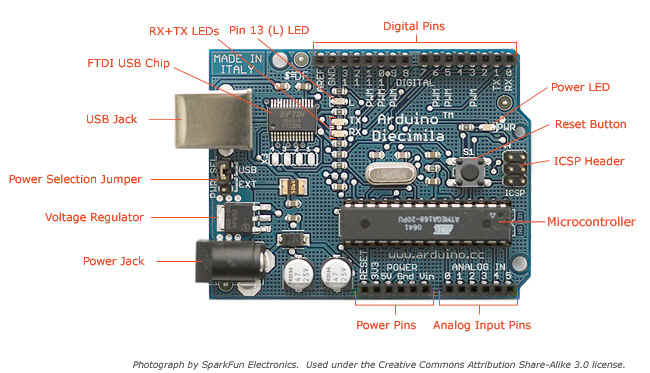
Arduino board is made of an an Atmel AVR Microprocessor, a crystal or oscillator
(basically a crude clock that sends time pulses to the microcontroller to enable
it to operate at the correct speed) and a 5-volt linear regulator. Depending on
what type of Arduino you have, you may also have a USB connector to enable it to
be connected to a PC or Mac to upload or retrieve data. The board exposes the
microcontrollerʼs I/O (Input/Output) pins to enable you to connect those
pins to other circuits or to sensors, etc.
To program the Arduino (make it do what you want it to) you also
use the Arduino IDE (Integrated Development
Environment), which is a piece of free software, that enables you to program in
the language that the Arduino understands. In the case of the Arduino the
language is C. The IDE enables you to write a computer program, which is a set
of step-bystep instructions that you then upload to the Arduino.
Na programovanie Arduina (aby
robil to čo chcete vy) môžete taktiež použiť IDE Arduina (Integrated Development
Environment - Integrované vývojové prostredie), ktorý je voľne šíriteľným
programom, pomocou ktorého viete programovať Arduino v jazyku ktorému
rozumie. V tomto prípade týmto jazykom je C jazyk. IDE umožňuje vám napísať
počítačový program, ktorý predstavuje postupnosť príkazov tak ako sa majú
za sebou vykonať, ktorú následne môžete nahrať do Arduina.
Then your Arduino will carry out those instructions and interact
with the world outside. In the Arduino world, programs are known as
ʻSketchesʼ.

The Arduino hardware and software are both Open Source, which
means the code, the schematics, design, etc. are all open for anyone to take
freely and do what they like with it.
This means there is nothing stopping anyone from taking the
schematics and PCB designs of the Arduino and making their own and selling them.
This is perfectly legal, and indeed the whole purpose of Open Source, and indeed
the Freeduino that comes with the Earthshine Design Arduino Starter Kit is a
perfect example of where someone has taken the Arduino PCB design, made their
own and are selling it under the Freeduino name. You could even make your own
Arduino, with just a few cheap components, on a breadboard.
The only stipulation that the Arduino development team put on
outside developers is that the Arduino name can only be used exclusively by them
on their own products and hence the clone boards have names such as Freeduino,
Boarduino, Roboduino, etc.
As the designs are open source, any clone board, such as the
Freeduino, is 100% compatible with the Arduino and therefore any software,
hardware, shields, etc. will all be 100% compatible with a genuine Arduino.
The Arduino can also be extended with the use of
ʻShieldsʼ which are circuit boards containing other devices (e.g. GPS
receivers, LCD Displays, Ethernet connections, etc.) that you can simply slot
into the top of your Arduino to get extra functionality. You donʼt
have to use a shield if you donʼt want to as you can make the exact same
circuitry using a breadboard, some veroboard or even by making your own
PCBʼs.
There are many different variants of the Arduino available. The
most common one is the Diecimila or the Duemilanove. You can also get Mini, Nano
and Bluetooth Arduinoʼs.
New to the product line is the new Arduino Mega with increased
memory and number of I/O pins.
Probably the most versatile Arduino, and hence the reason it is
the most popular, is the Duemilanove. This is because it uses a standard 28 pin
chip, attached to an IC Socket. The beauty of this systems is that if you make
something neat with the Arduino and then want to turn it into something
permanent (e.g. Or understairs cupboard light), then instead of using the
relatively expensive Arduino board, you can simply use the Arduino to develop
your device, then pop the chip out of the board and place it into your own
circuit board in your custom device. You would then have made a custom embedded
device, which is really cool.
Then, for a couple of quid or bucks you can replace the AVR chip
in your Arduino with a new one. The chip must be pre-programmed with the Arduino
Bootloader to enable it to work with the Arduino IDE, but you can either burn
the Bootloader yourself if you purchase an AVR Programmer, or you can buy these
preprogrammed from many suppliers around the world.
Of course, Earthshine Design provide preprogrammed Arduino chips
in itʼ store for a very reasonable price.
If you do a search on the Internet by simply typing
ʻArduinoʼ into the search box of your favourite search engine, you
will be amazed at the huge amount of websites dedicated to the Arduino. You can
find a mind boggling amount of information on projects made with the Arduino and
if you have a project in mind, will easily find information that will help you
to get your project up and running easily.
The Arduino is an amazing device and will enable you to make
anything from interactive works of art to robots. With a little enthusiasm to
learn how to program the Arduino and make it interact with other components a
well as a bit of imagination, you can build anything you want.
This book and the kit will give you the necessary skills needed
to get started in this exciting and creative hobby.
So, now you know what an Arduino is and what you can do with it,
letʼs open up the starter kit and dive right in.
This section will presume you have a PC running Windows or a Mac
running OSX (10.3.9 or later). If you use Linux as your Operating System, then
refer to the Getting Started instructions on the Arduino website at
http://www.arduino.cc/playground/Learning/Linux
Táto časť predpokladá, že máte
PC s operačným systémom Windows, alebo Mac na ktorom beží OSX (10.3.9 alebo
jeho neskoršie verzie). Ak používate Linux ako váš operačný systém,
potom sa pozrite na inštrukcie v časti Začíname ( Getting Started ) na stránkach
Arduina http://www.arduino.cc/playground/Learning/Linux

Get the Freeduino and the USB Cable
Vezmite Ferduino a USB kábel
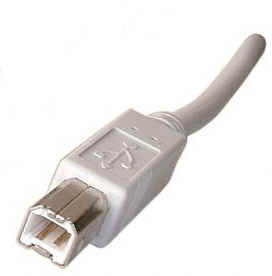
Firstly, get your Freeduino board and lay it on the table in
front of you. Take the USB cable and plug the B plug (the fatter squarer end)
into the USB socket on the Freeduino.
At this stage do NOT connect the Freeduino to your PC or Mac yet.
Download the Arduino IDEV tejto fáze ešte NEpripájajte Freeduino k vášmu PC (alebo Mac-u). Stiahnite si IDE Arduina.
Download the Arduino IDE
Stiahnite si IDE Arduina
Download the Arduino IDE from the Arduino
download
page. As of the time of
writing this book, the latest IDE version is 0015. The file is a ZIP file so you
will need to uncompress it. Once the download has finished, unzip the file,
making sure that you preserve the folder structure as it is and do not make any
changes.
Stiahnite si IDE Arduina
z download stránky. V čase písania tejto knihy posledná verzia bola
0015. Súbor je typu ZIP a preto ho budete musieť rozbaliť. Keď sa skočí sťahovanie
súboru, rozpakujte súbor, a uistite sa, že sa zachovala štruktúra podadresárov
v pôvodnej forme a nedošlo ku žiadnym zmenám.
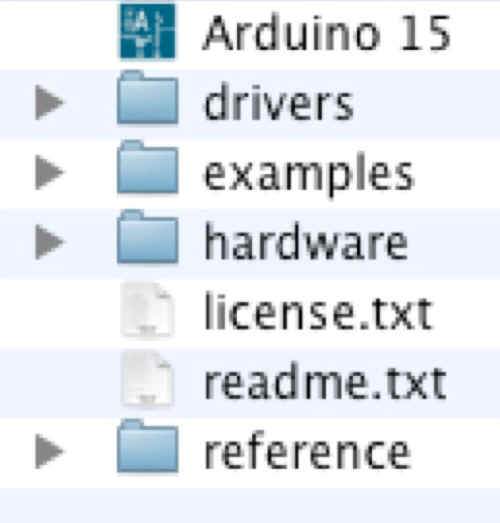
If you double-click the folder, you will see a few files and
sub-folders inside.
Ak dvakrát kliknete na
podadresár (folder), uvidíte vo vnútri niekoľko súborov a vnorených
podadresárov.
Install the USB Drivers
Inštalácia USB Drajverov (Ovládacích programov USB)
If you are using Windows you will find the drivers in the
drivers/FTDI
USB Drivers directory of
the Arduino distribution. In the next stage (“Connect the Freeduino”), you
will point W i n d o w ʼ s A
d d N e w Hardware wizard
to these drivers.
Ak používate Windows nájdete
obslužné programy v distribúcii Arduina v časti drivers/FTDI
USB Drivers. V ďalšej stati ("Pripoj Freeduina"), kliknete
na službu operačného systému Windows Pridaj nový hardvér.
If you have a Mac these are in the
drivers directory.
Ak máte Mac tieto sa
nachádzajú v podadresári drivers (DRAJVERY=obslužné programy pre hardware).
If you have an older Mac like a PowerBook, iBook, G4 or G5, you
should use the PPC drivers:
Ak máte starší Mac ako
napr. PowerBook, iBook, G4 alebo G5, mali by ste použiť PPC drivery:
FTDIUSBSerialDriver_v2_1_9.dmg.
If you have a newer Mac with an Intel chip, you need the Intel d r i v e r s :
Ak máte novší Mac s
čipom od Intelu, potrebujete driver od Intelu:
FTDIUSBSerialDriver_v2_2_9_Intel.dmg.
Double-click to mount the disk image and run the included
FTDIUSBSerialDriver.pkg.
Dvakrát kliknite na obrázok
pripojenia disku a zbehnite zahrnutý FTDIUSBSerialDriver.pkg.
The latest version of the drivers can be found on the
FTDI
website.
Najnovšie verzie
drajverov môžete nájsť na stránke FTDI.
Connect the Freeduino
Pripoj Freeduina
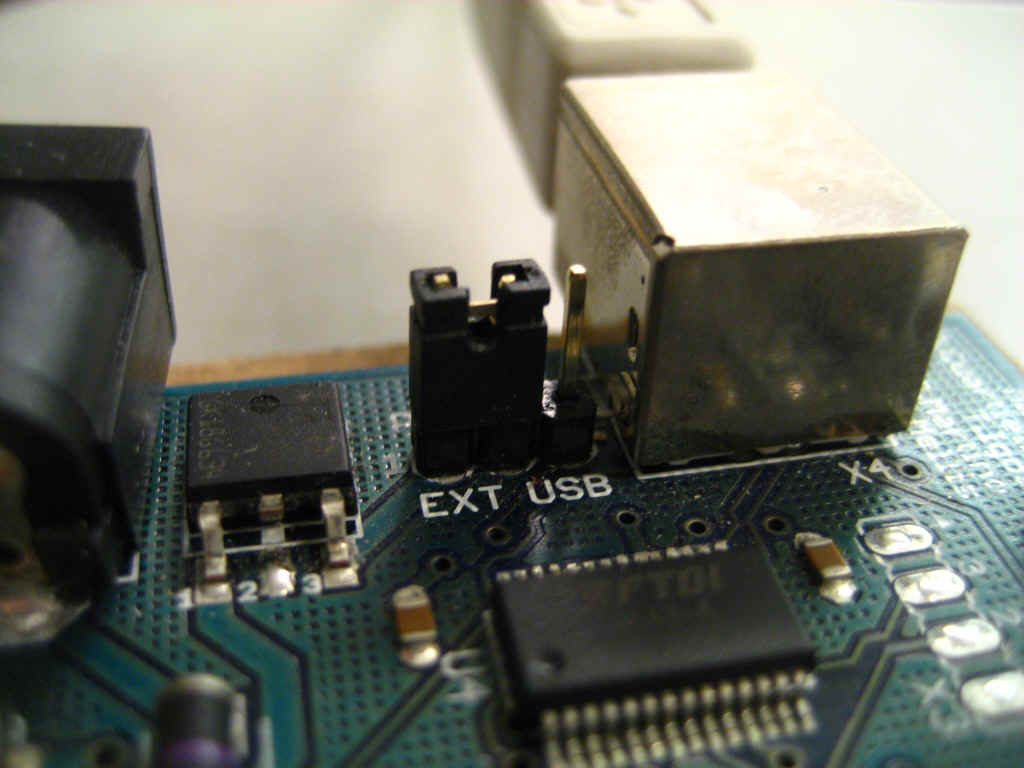
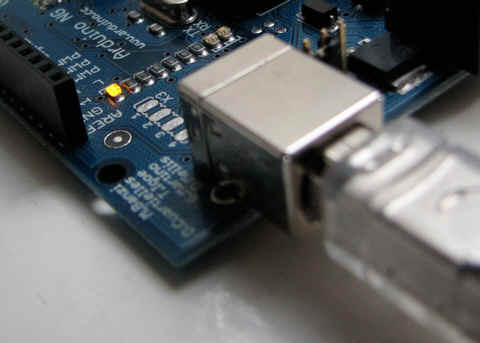
First, make sure that the little power jumper, between the power
and USB sockets, is set to USB and not EXTernal
power (not applicable if you have a Roboduino board, which has an Auto Power
Select function).
Najprv sa uistite, že malý jumper (skratovacia prepojka - vid obrázok),
medzi napájacím konektorom a USB konektorom je nastavený na USB a nie na
EXTerné napájanie (táto vec
nie je aplikovateľná na doske Roboduino /resp. Arduino Duemilanove, ktoré majú
funkciu Automatický výber napájania).
U s i n g
t h i s jumper you can either power the board from the
USB port (good for low current d e v i c e s l i k e LEDʼs, etc.) or from
an external power supply (6-12V DC).
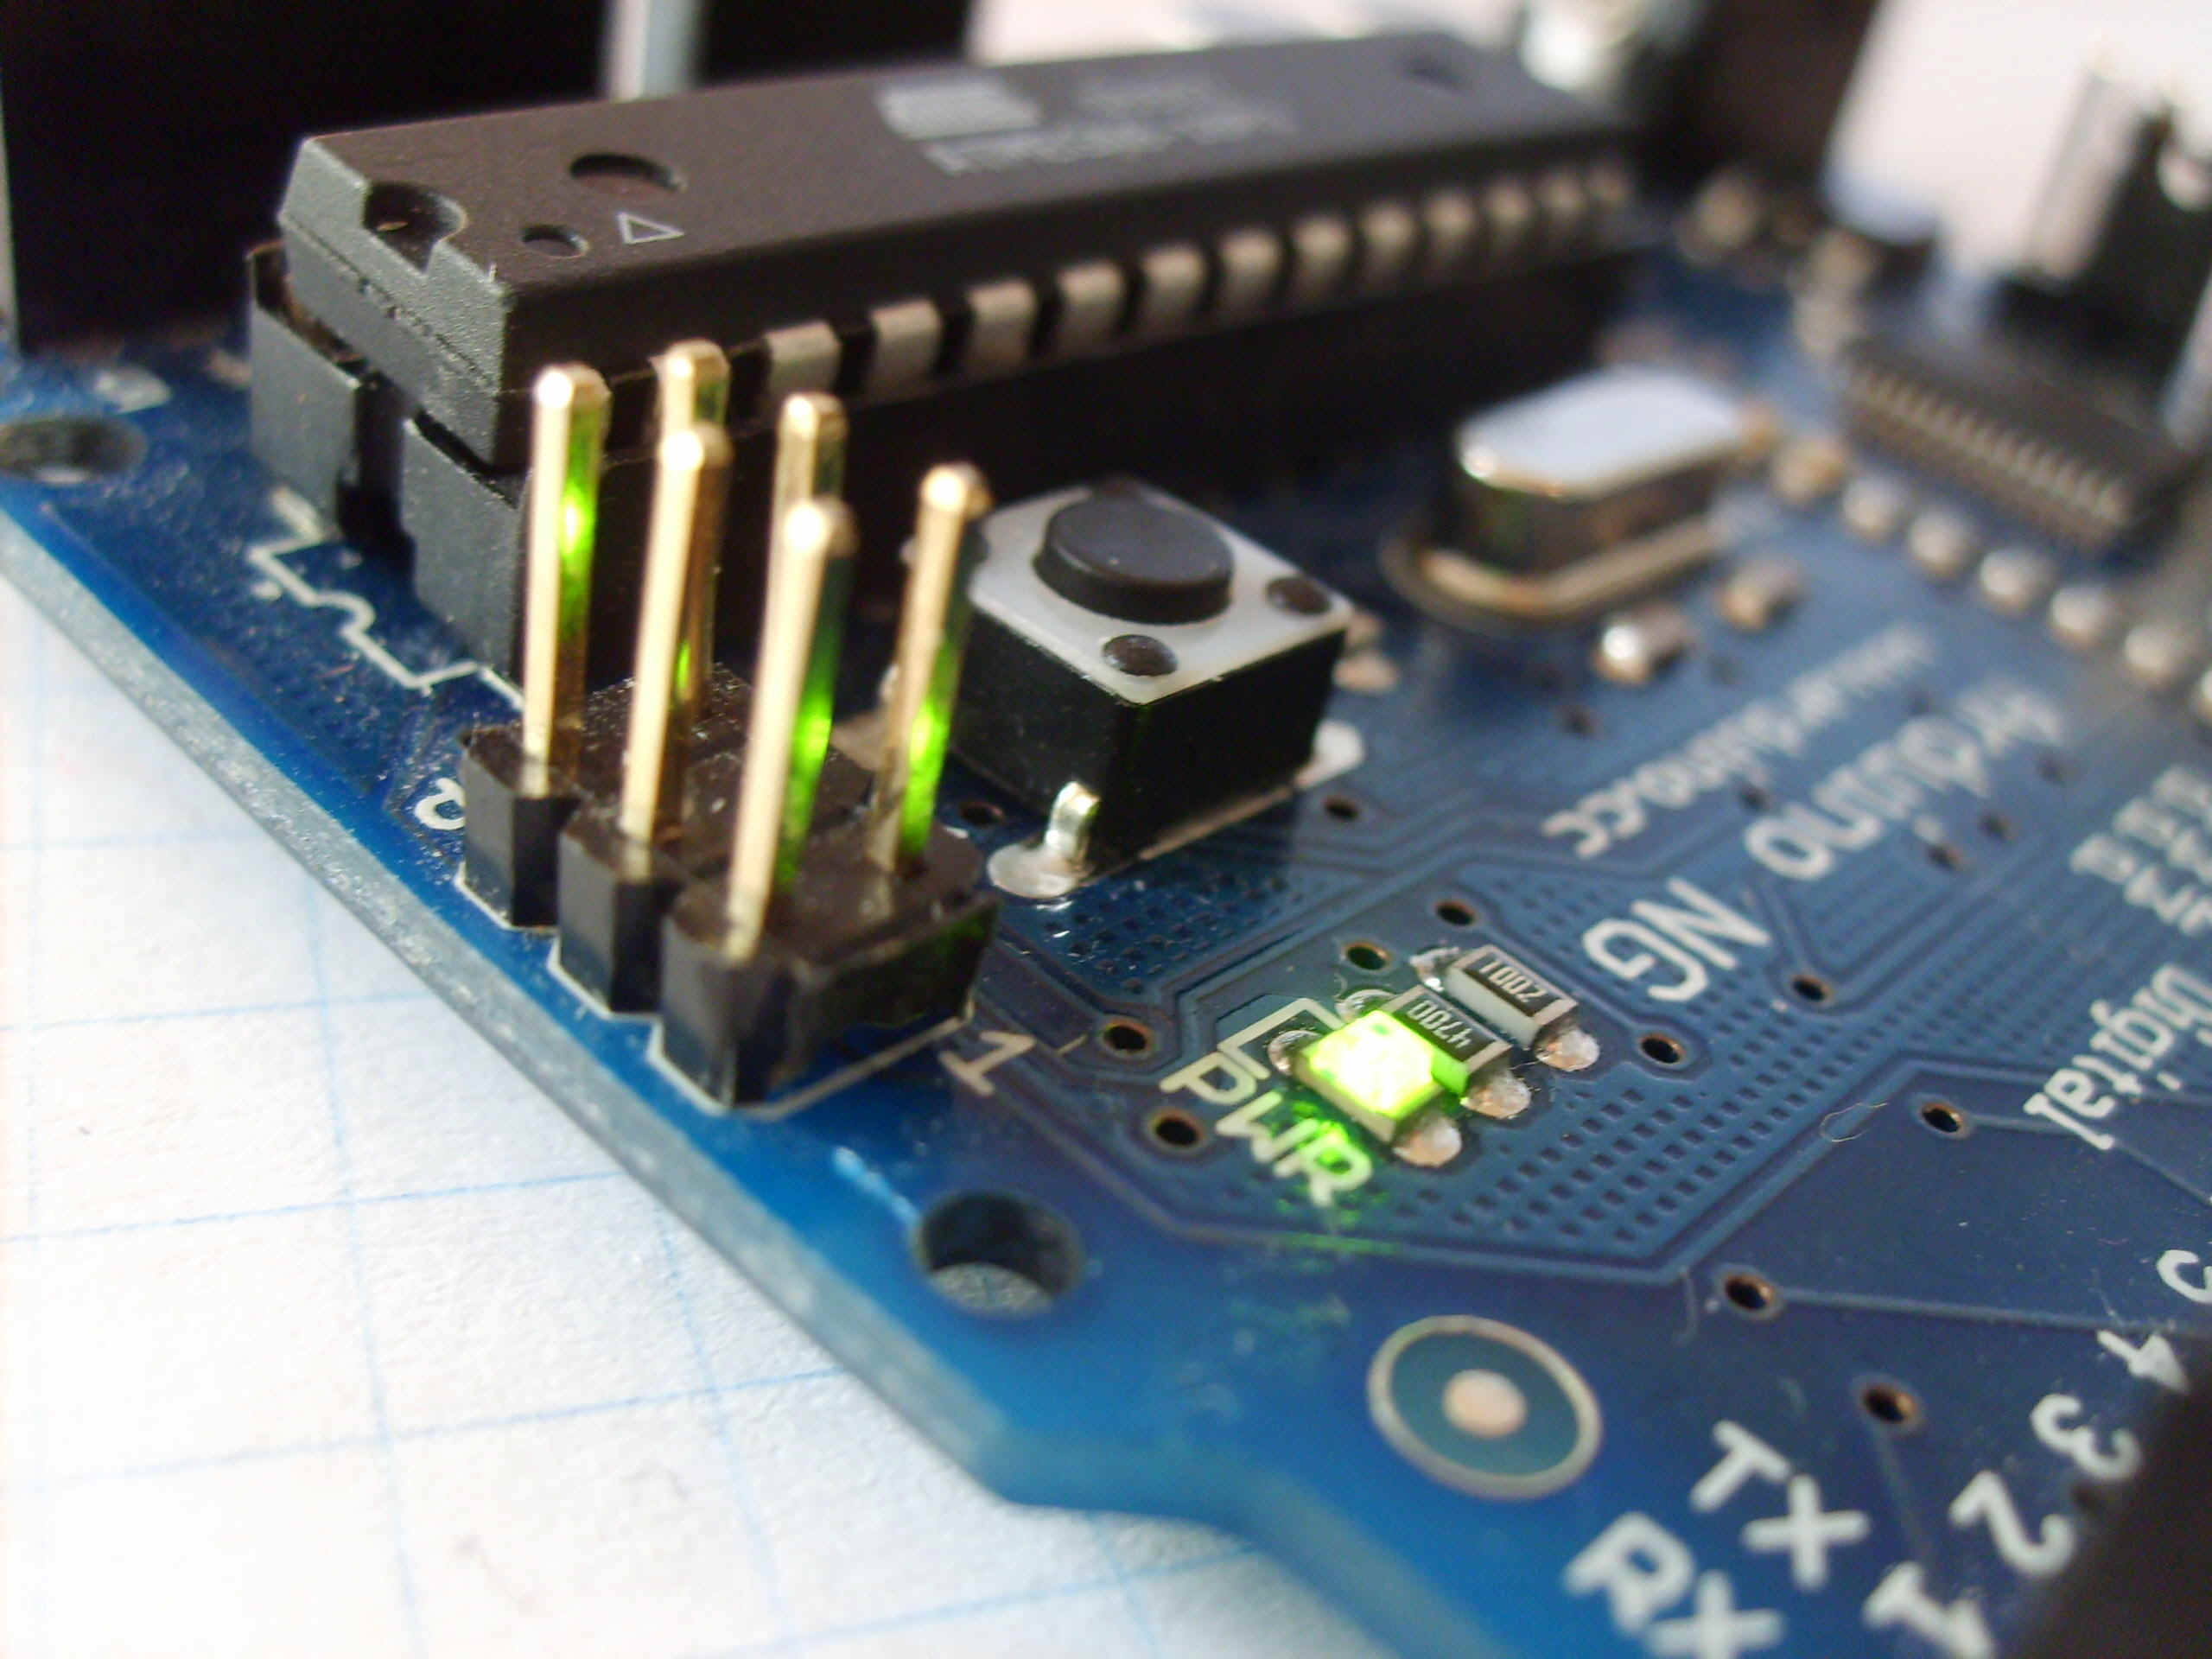
Now, connect the other end of the USB cable into the USB socket
on your PC or Mac. You will now see the small power LED (marked PWR above the
RESET switch) light up to show you have power to the board.
If you have a Mac, this stage of the process is complete and you
can move on to the next Chapter. If you are using Windows, there are a few more
steps to complete (Damn you Bill Gates!).
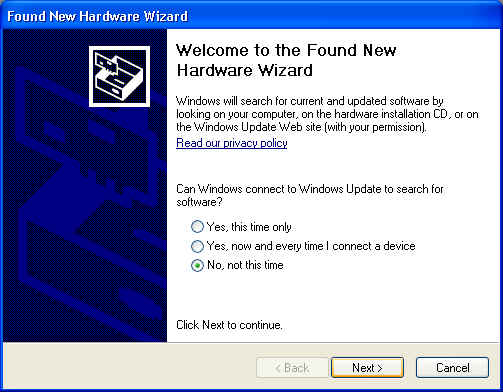
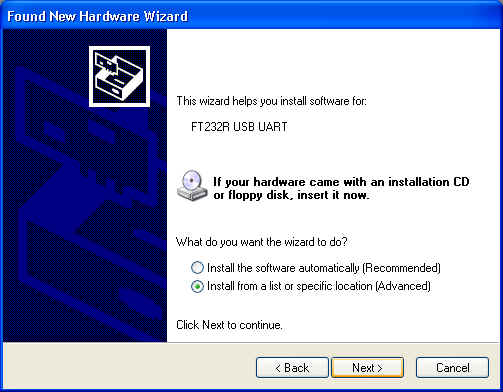
On Windows the
Found New Hardware Wizard will now open up as Windows will have detected that you have connected a new piece of hardware (your Freeduino board) to your PC. Tell it NOT to connect to Windows update (Select No, not at this time) and then click Next.Vo Windows sa teraz otvorí okno Našlo sa nové hardwarové zariadenie nakoľko Windows detekoval, že ste pripojili nový kúsok hardvéru (vašu dosku Arduina/Freeduina) k vášmu PC. Odpovedzte NOT (nie) aby sa Windows nespojil na obnovu (vyberte No, not at this time - nie teraz) a klinknite Next - Ďalej.
On the next page select “
Install from a list or specific location (Advanced)” and click Next.Na nasledovnej stránke vyberte “Install from a list or specific location (Advanced)” ("Inštalujte zo zoznamu alebo špecifického umiestnenia (Pokročilí)" a kliknite Next - Ďalej.
Make sure that “
Search for the best driver in these locations” is checked.Uistite sa že ste navolili “Search for the best driver in these locations” ("Vyberte nalepší ovládač v danom umiestnení")
Uncheck
“Search removable media”. Check “Include this location in the search” and then click the Browse button. Browse to the location of the USB drivers and then click Next.Zrušte označenie “Search removable media” ("Vyberte výmenné médium t.j.CD/DVD"). Označte “Include this location in the search” ("Zahrnte toto umiestnenie do prehľadávania") a potom kliknite na tlačidlo Browse - Prehľadávaj. Nájdite umiestnenie USB driverov (obslužných programov) a kliknite Next - Pokračuj.

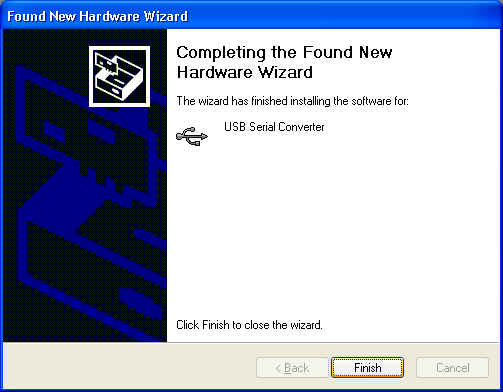
The wizard will now search for a suitable driver and then tell
you that a “USB Serial Convertor” has been found and that the hardware
wizard is now complete.
Click Finish.
You are now ready to upload your first
Sketch.
Teraz ste pripravení
urobiť upload (nahranie) vášho prvého programu.
Upload your first Sketch
Nahraj svoj prvý program.

Now that your Freeduino has been connected and the drivers for
the USB chip have been installed, we are now ready to try out the Arduino for
the first time and upload your first Sketch.
Navigate to your newly unzipped Arduino folder and look for the
Arduino IDE icon, which looks something like this....
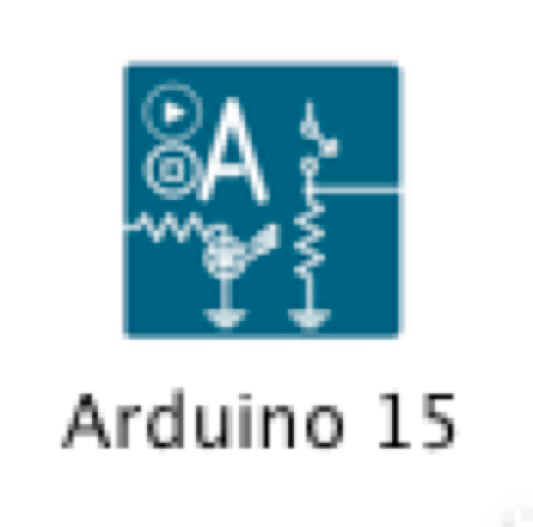
Double click the ICON to open up the IDE. You will then be
presented with a blue and white screen with a default sketch loaded inside.
This is the Arduino IDE (Integrated Development Environment) and
is where you will write your Sketches (programs) to upload to your Arduino board.
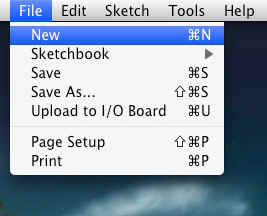
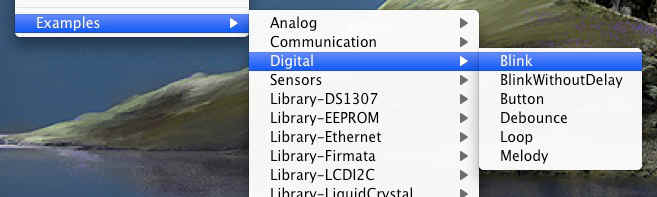
We will take a look at the IDE in a little more detail in the
next chapter. For now, simply click File in the file menu and scroll down to
Sketchbook. Then scroll down to Examples and c l i c k i t . You w i l l be
presented with a list of Example sketches that you can use to try out your
Arduino. Now click on Digital and inside there you will find an example Sketch
called Blink. Click on this.
T h e B l i n k Sketch will n o w b e loaded into the IDE and
you will see the Sketch inside the white code window.
Vytvorenie spojenia medzi Arduinom a vývojovým prostredím.
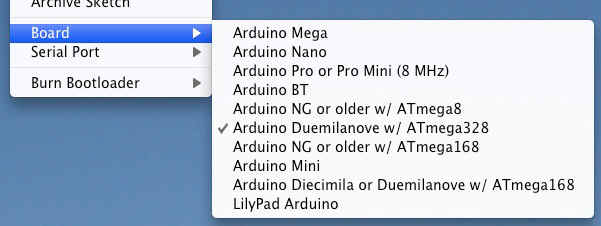
Now, before we upload the Sketch, we need to tell the IDE what
kind of Arduino we are using and the details of our USB port. Go to the file
menu and click Tools, then click on Board. You will be presented with a
list of all of the different kinds of Arduino board that can be connected
to the IDE. Our Freeduino board will either be fitted with an Atmega328 or an
Atmega168 chip so choose “Arduino Duemilanove w/ATmega328” if you have
a 328 chip or “Arduino Diecimila or Duemilanove w/ ATmega168” if you have a
168 chip.
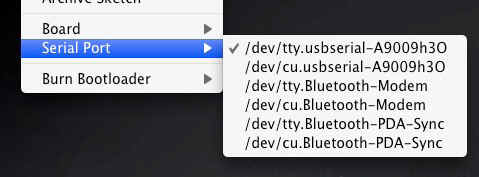
Now you need to tell the IDE the details of your USB port, so
now click on Tools again, scroll down to Serial Port and a list of the
available serial ports on your system will be displayed. You need to choose the
one that refers to your USB cable, which is usually listed as something like
/dev/tty.usbserial-xxxx
on a Mac or something like
Com 4 on
Windows so click on that. If not sure, try each one till you find one that works.
Now that you have selected the correct board and USB port you
are ready to upload the Blink Sketch to the board.
You can either click the Upload button, which is the 6th button from the left at the top with an
arrow pointing to the right (hover your mouse pointer over the buttons to see
what they are) or by clicking on File in the file menu and scrolling down to
Upload to I/O Board and clicking on that.
Môžete buď kliknúť na tlačidlo Upload, ktoré je 6-tym
tlačidlom zľava, v hornej časti so šípkou smerujúcou doprava (nechajte kurzor
myšky pohybovať sa nad tlačidlami a oni ukážu čo sú zač) alebo kliknite v menu
na File a následne posuňte sa dole na Upload to I/O Board (Zápis do
dosky) a kliknite naň.
Presuming everything has been set up correctly you will now see the RX and TX LEDʼs (and also LED 13) on the Freeduino flash on and off very quickly as data is uploaded to the board. You will see Uploading to I/O
Board.... Just below the code window too.Pri predpoklade, že ste nastavili všetko správne by ste mali teraz vidieť LED diody RX a TX (a taktiež LED 13) na Freeduine blikať dosť rýchlo nakoľko sa dáta prenášajú na dosku. V prostredí IDE taktiež uvidíte Uploading to I/O Board.... priamo dole pod programovým oknom.
Once the data has been uploaded to the board successfully you
will get a Done Uploading message in the IDE and the RX/TX LEDʼs will stop
flashing.
The Arduino will now reset itself and immediately start to run
the Sketch that you have just uploaded.
The Blink sketch is a very simple sketch that blinks LED 13,
which is a tiny green LED soldered to the board and also connected to Digital
Pin 13 from the Microcontroller, and will make it flash on and off every 1000
milliseconds, or 1 second.
If your sketch has uploaded successfully, you will now see this
LED happily flashing on and off slowly on your board.
If so, congratulations, you have just successfully installed
your Arduino, uploaded and ran your first sketch.
We will now explain a bit more about the Arduino IDE and how to
use it before moving onto the projects that you can carry out using the hardware
supplied with the kit. For our first project we will carry out this Blink
LED sketch again, but this time using an LED that we will physically connect to
one of the digital output pins on the Arduino. We will also explain the hardware
and software involved in this simple project. But first, letʼs take a
closer look at the Arduino IDE.
IDE(Vývojové prostredie) Arduina

When you open up the Arduino IDE it will look very similar to the image above. If you are using Windows or Linux there will be some slight differences but the IDE is pretty much the same no matter what OS you are using.
The IDE is split up into the Toolbar across the top, the code or Sketch Window in the centre and the Serial Output window at the bottom.
The Toolbar consists of 7 buttons, underneath the Toolbar is a tab, or set of tabs, with the filename of the code within the tab. There is also one further button on the far right hand side.
Along the top is the file menu with drop down menus headed under File, Edit, Sketch, Tools and Help. The buttons in the Toolbar provide convenient access to the most commonly used functions within this file menu.
| Verify/ Compile |
Stop | New | Open | Save | Upload | Serial Monitor |
|
The Toolbar buttons are listed above. The functions of each button are as follows :-
Verify/Compile
Checks the code for errorsStop Stops the serial monitor, or un-highlights other buttons
New Creates a new blank Sketch
Open Shows a list of Sketches in your sketchbook
Save Saves the current Sketch
Upload Uploads the current Sketch to the Arduino
Serial Monitor Displays serial data being sent from the Arduino
The Verify/Compile button is used to check that your code is correct, before you upload it to your Arduino.
The Stop button will stop the Serial Monitor from operating. It will also un-highlight other selected buttons. Whilst the Serial Monitor is operating you may wish to press the Stop button to obtain a ʻsnapshotʼ of the serial data so far to examine it. This is particularly useful if you are sending data out to the Serial Monitor quicker than you can read it.
The New button will create a completely new and blank Sketch read for you to enter code into. The IDE will ask you to enter a name and a location for your Sketch (try to use the default location if possible) and will then give you a blank Sketch ready to be coded.
The tab at the top of the Sketch will now contain the name you have given to your new sketch.
The Open button will present you with a list of Sketches stored within your sketchbook as well as a list of Example sketches you can try out with various peripherals once connected.
The Save button will save the code within the sketch window to your sketch file. Once complete you will get a ʻDone Saving message at the bottom of the code window.
The Upload to I/O Board button will upload the code within the current sketch window to your Arduino. You need to make sure that you have the correct board and port selected (in the Tools menu) before uploading. It is essential that you Save your sketch before you upload it to your board in case a strange error causes your system to hang or the IDE to crash.
It is also advisable to Verify/Compile the code before you upload to ensure there are no errors that need to be debugged first.
The Serial Monitor is a very useful tool, especially for debugging your code. The monitor displays serial data being sent out from your Arduino (USB or Serial board). You can also send serial data back to the Arduino using the Serial Monitor. If you click the Serial Monitor button you will be presented with an image like the one above.
On the left hand side you can select the Baud Rate that the serial data is to be sent to/from the Arduino.
The Baud Rate is the rate, per second, that state changes or bits (data) are sent to/from the board. The default setting is 9600 baud, which means that if you were to send a text novel over the serial communications line (in this case your USB cable) then 9600 letters, or symbols, of the novel, would be sent per second.
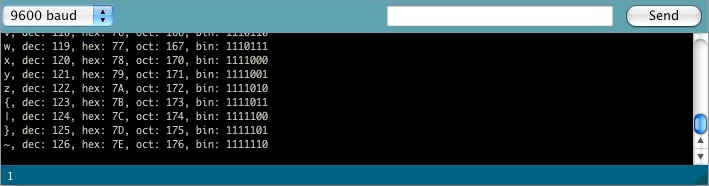
To the right of this is a blank text box for you to enter text to send back to the Arduino and a Send button to send the text within that field. Note that no serial data can be received by the Serial Monitor unless you have set up the code inside your sketch to do so. Similarly, the Arduino will not receive any data sent unless you have coded it to do so.
Finally, the black area is where your serial data will be displayed. In the image above, the Arduino is running the ASCIITable sketch, that can be found in the Communications examples. This program outputs ASCII characters, from the Arduino via serial (the USB cable) to the PC where the Serial monitor then displays them.
To start the Serial Monitor press the Serial Monitor button and to stop it press the Stop button. On a Mac or in Linux, Arduino board will reset itself (rerun the code from the beginning) when you click the Serial Monitor button.
Once you are proficient at communicating via serial to and from the Arduino you can use other programs such as Processing, Flash, MaxMSP, etc. To communicate between the Arduino and your PC.
We will make use of the Serial Monitor later on in our projects when we read data from sensors and get the Arduino to send that data to the Serial Monitor, in human readable form, for us to see.
The Serial Monitor window is also were you will see error messages (in red text) that the IDE will display to you when trying to connect to your board, upload code or verify code.
Below the Serial Monitor at the bottom left you will see a number. This is the current line that the cursor, within the code window, is at. If you have code in your window and you move down the lines of code (using the ↓ key on your keyboard) you will see the number increase as you move down the lines of code. This is useful for finding bugs highlighted by error messages.
Across the top of the IDE window (or across the top of your screen if you are using a Mac) you will see the various menus that you can click on to access more menu items.
![]()
The menu bar across the top of the IDE looks like the image above (and slightly different in Windows and Linux). I will explain the menus as they are on a Mac, the details will also apply to the Windows and Linux versions of the IDE.
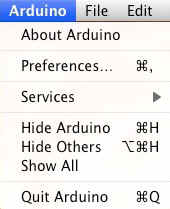
The first menu is the Arduino
menu. Within this is the About Arduino option, which when pressed will show you the current version number, a list of the people involved in making this amazing device and some further information.Underneath that is the
Preferences option. This will bring up the Preferences window where you can change various IDe options, such as were you default Sketchbook is stored, etc.Also, is the Quit option, which will Quit the program.
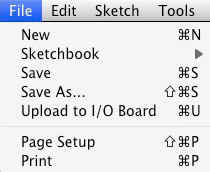
The next menu is the File menu. In here you get access to options to create a New sketch, take a look at Sketches s t o r e d i n y o u r Sketchbook (as well as the Example Sketches), options to Save your Sketch (or Save As if you want to give it a different name). You also have the option to upload your sketch to the I/O Board (Arduino) as well as the Print options for printing out your code.
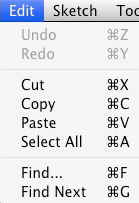
Next is the Edit menu. In here you get options to enable you to Cut, Copy and Paste sections of code.
Select All of your code as well as Find certain words or phrases within the code. Also included are the useful Undo and Redo options which come in handy when you make a mistake.
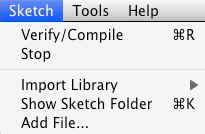
Our next menu is the Sketch menu which gives us access to the Verify/Compile functions and some other useful functions you will use later on.
These include the Import Library option, which when clicked will bring up a list of t h e a v a i l a b l e l i b r a r i e s , s t o r e d w i t h i n y o u r libraries folder.
A Library, is a collection of code, that you can include in your sketch, to enhance the functionality of your project. It is a way of preventing you from ʻre-inventing the wheelʼ by reusing code already made by someone else for various pieces of common hardware you may encounter whilst using the Arduino.
For example, one of the libraries you will find is Stepper, which is a set of functions you can use within your code to control a Stepper Motor.
Somebody else has kindly already created all of the necessary functions necessary to control a stepper motor and by including the Stepper library into our sketch we can use those functions to control the motor as we wish. By storing commonly used code in a library, you can re-use that code over and over in different projects and also hide the complicated parts of the code from the user.
We will go into greater detail concerning the use of libraries later on. Finally within the Sketch menu is the Show Sketch Menu option, which will open up the folder were your Sketch is stored. Also, there is the Add File option which will enable you to add another source file to your Sketch. This functionality allows you to split larger sketches into smaller files and then Add them to the main Sketch.
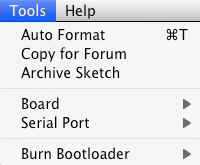
The next menu in the IDE is the
Tools menu.Within this are the options to select the Board and Serial Port we are using, as we did when setting up the Arduino for the first time.
Also we have the Auto Format function that formats your code to make it look nicer.
The Copy for Forum option will copy the code within the Sketch window, but in a format that when pasted into the Arduino forum (or most other Forums for that matter) will show up the same as it is in the IDE, along with syntax colouring, etc.
The Archive Sketch option will enable you to compress your sketch into a ZIP file and asks you were you want to store it.
Finally, the Burn Bootloader option can be used to burn the Arduino Bootloader (piece of code on the chip to make it compatible with the Arduino IDE) to the chip. This option can only be used if you have an AVR programmer and have replaced the chip in your Arduino or have bought blank chips to use in your own embedded project. Unless you plan on burning lots of chips it is usually cheaper and easier to just buy an ATmega chip with the Arduino Bootloader already preprogrammed.
Many online stores stock preprogrammed chips and obviously these can be found in the
Earthshine Design store.The final menu is the
Help menu were you can find help menus for finding out more information about the IDE or links to the reference pages of the Arduino website and other useful pages.Donʼt worry too much about using the IDE for now as you will pick up the important concepts and how to use it properly as we work our way through the projects.
So, on that note, letʼs get on with it.
- arduino_project1.pdf
- arduino_project2.pdf
- arduino_project3.pdf
- arduino_project4.pdf
- arduino_project5.pdf
- arduino_project6.pdf
- arduino_project7.pdf
- arduino_project8.pdf
- arduino_project9.pdf
- arduino_project10.pdf
- arduino_project11.pdf
- arduino_project12.pdf
- arduino_project13.pdf
- arduino_project14.pdf
- arduino_project15.pdf
- arduino_project16.pdf
- arduino_project17.pdf